

Earlier, I discussed simple and affordable tools and instruments for characterizing radiated emissions and immunity. This month, we will tackle electrostatic discharge (ESD), which I have found to be equally as prevalent as radiated immunity.
Most designers end up trying to troubleshoot ESD at the compliance test lab. The drawback is that troubleshooting in this environment is time-consuming and expensive. It also greatly delays product introduction. Wouldn't it be nice to move this troubleshooting process to your own workbench? Read on to learn how!
ESD Introduction
ESD is a challenging product failure to debug. Part of the reason for this is the intermittent nature of the discharges. To help correlate circuit disruption with ESD, I will describe a simple ESD detector circuit you can build, along with other ways to detect the events when they occur. Fortunately, we also have ESD simulators that can inject a controlled discharge into a product to force failures.
ESD generated from a person touching an enclosure or a cable can disrupt the circuits in electronic systems. A typical human-body ESD event creates a high-current discharge into any metallic object as a person’s finger approaches it. The resulting current pulse may amount to several amperes with a very fast leading edge with a rise time of less than 1 ns and with a secondary exponentially decaying secondary pulse (see Figure 1).
 Figure 1. An idealized current waveform from an ESD event can have a rise time of less than 1 ns. (Courtesy Keith Armstrong.)
ESD is usually tested between 4 and 15 kV for most commercial and consumer products and the discharge waveform follows the "human body model" shown above. Depending on the simulator voltage setting, the resulting ESD current can approach over 30 amps of instantaneous current at its peak.
Normally, ESD current pulses of up to 8 or 15 kV are applied to any external metal that could be touched by the equipment operator (see Figure 2). This would include front panel controls, displays, connector ground shells, metal enclosures, and the like. Exceptions under most ESD standards would preclude testing directly into I/O pins or internal circuitry. This test is potentially destructive, so I usually try to test fewer sensitive points first and with lower test voltages.
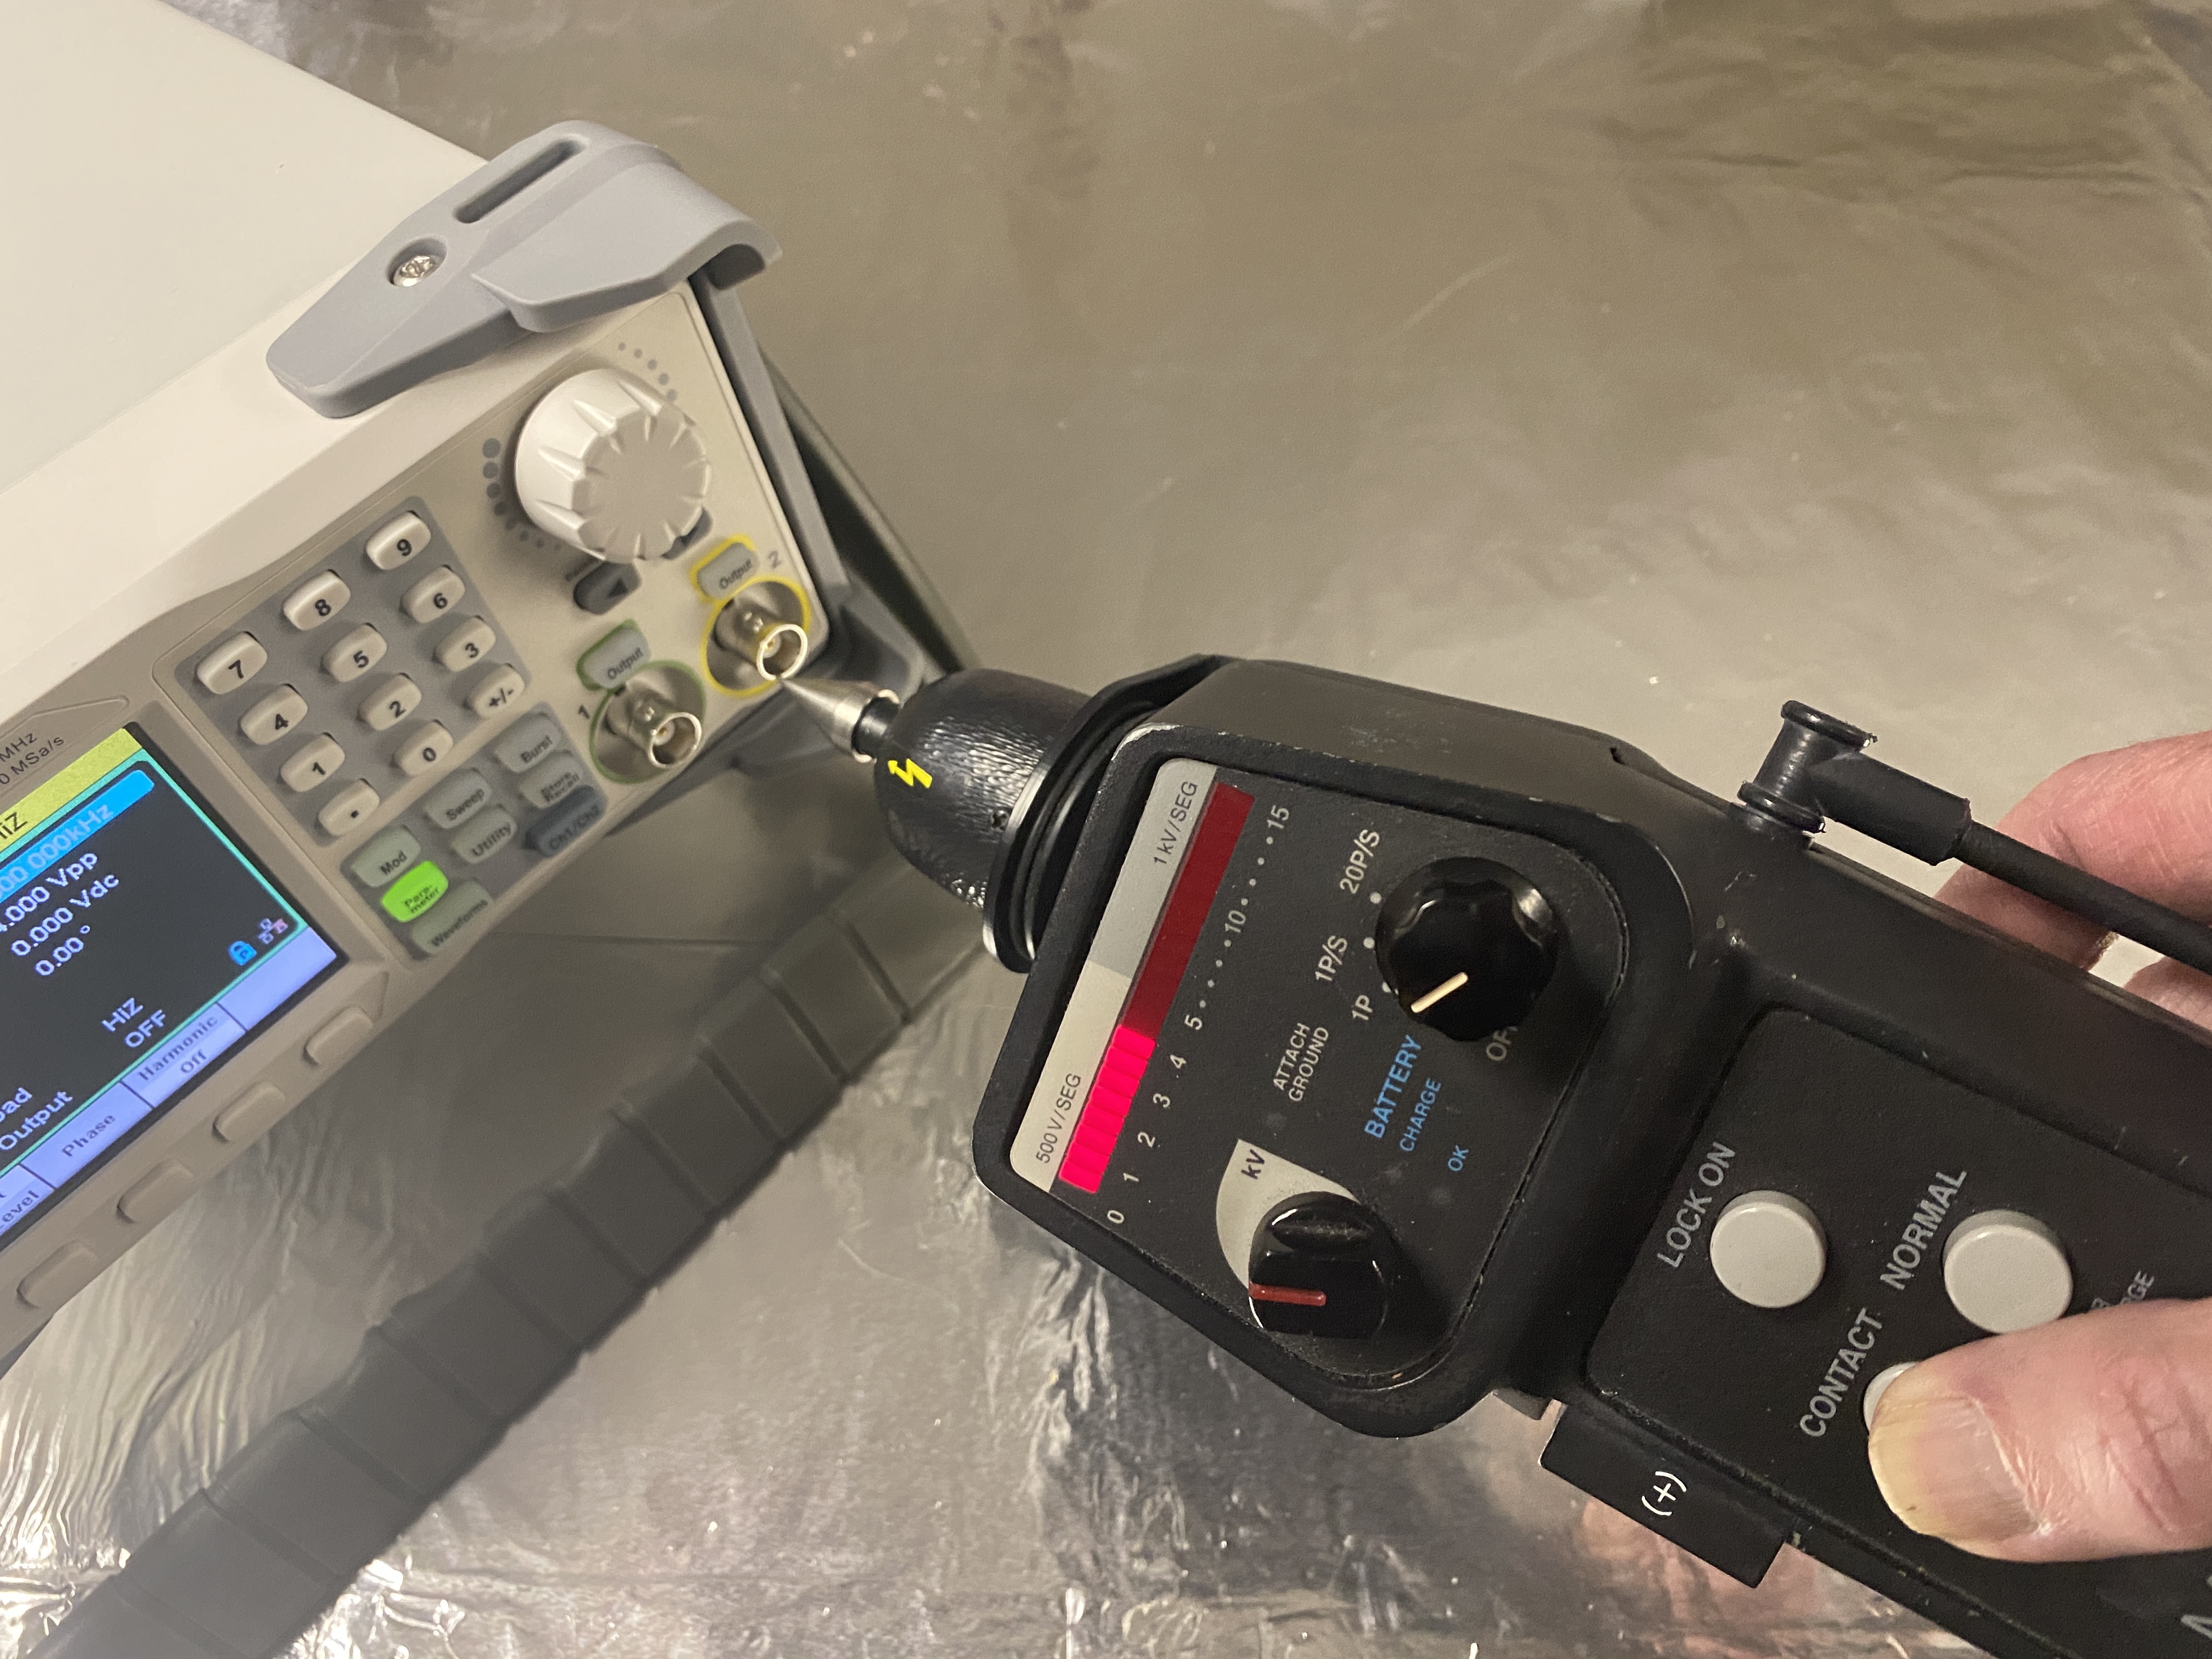 Figure 2. The official ESD compliance test is performed with an ESD simulator, which applies ESD pulses to metallic points that are accessible to humans.
The ESD compliance test is performed on a metal-topped table according to the international standard, IEC 61000-4-2. This is relatively easy to set up in-house and the standard shows the table dimensions and procedure. However, when lacking a simulator and table setup, it’s possible to simulate ESD events using simpler means.
Simple ESD Generators
Bag of Coins
While you can’t beat an actual ESD simulator for pre-compliance testing, there are a number of simple ESD generators that will work well to at least give you a general feel for whether your circuitry is immune. My colleague, Doug Smith, has developed some simple tools to check ESD immunity. The simplest is a clear sandwich bag with several coins inside (see Figure 3). Shaking this near your circuit will result in radiated field emissions several volts with a rise time of about 100 ps.
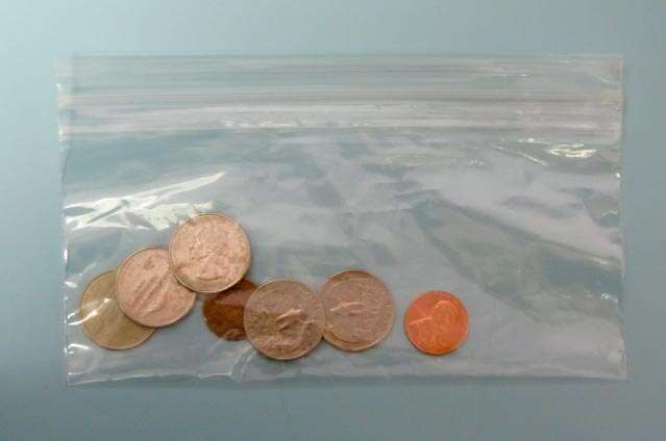 Figure 3. Shaking a few coins in a sandwich bag will generate large amounts of ESD with edges around 100 ps.
Spark Gap Ruler
Another idea by Doug is what I call an ESD spark gap ruler (see Figure 4). This is constructed by taping down a length of copper tape to a plastic foot-long ruler. Take a metal straight edge and a sharp knife or razor blade and cut a couple diagonals in the middle. By removing the upper and lower triangle pieces, you are left with a dipole antenna with a spark gap with tips spaced very close together. The objective is to get as narrow a space between the points as possible without touching. I covered the tape with a layer of clear packing tape to protect the small air gap.
Holding the ruler on one end, take a small Styrofoam plate (alternatively, bubble wrap works as well,) and rub it on your arm or hair to create an electrostatic charge, then move it back and forth near the spark gap. The amount of ESD field generated by this simple spark gap will surprise you. I have picked up the signal from 200 ft. away using a sensitive commercial ESD detector. By holding this near your circuitry or product under test, you will be able to quickly assess the ESD immunity. This will generate several volts as measured with a short antenna connected to an oscilloscope.
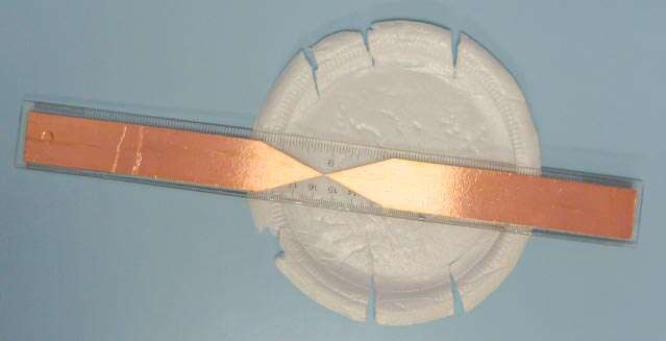 Figure 4. A “spark gap” ESD generator.
BBQ Grill Igniter
Other simple DIY ESD generators include this BBQ grill igniter (see Figure 5). You can purchase a replacement kit for a few dollars and the included wiring makes a good loop antenna. Holding this near your circuit board or close to the I/O and input ports to your product can indicate quickly if there are ESD issues. I have measured several volts of transient signal into a short antenna connected to an oscilloscope input. Edge speeds can be in the 50 to 200 ps range.
 Figure 5. A simple piezoelectric BBQ starter is the heart of this ESD generator and can create large fields with 50 to 200 ps edges. The included wire makes a good loop antenna.
BBQ Grill Lighter
Another option is the Coleman brand butane lighter, because you don’t need to open the gas valve in order to trigger a spark (see Figure 6). This can produce an air discharge spark, which can be injected into the product under test. By carefully removing part of the outer metal shroud with a Dremel tool, you will expose the center tip where the arcs originate. Connecting a ground return wire to the metal shroud will complete the circuit.
Just place the product under test on a metal-top table (or lay out some aluminum foil to cover the table top as a conductive plane). You will need a way for the electrostatic charges to bleed off the metal plane, and you can connect a 1 MΩ resistor from the metal plane to earth. Then, connect the ground return wire to the metal plane, hold the lighter tip within 1/4-in. and start triggering the arcs. This lighter will produce from 4 to 6 kV air discharges.
 Figure 6. The Coleman brand lighter is unique in that the butane has a separate control switch with no need to empty the reservoir. Cut the metal shroud back with a Dremel tool to expose the tip and connect a length of grounding wire. It produces about 4 to 6 kV from the piezoelectric element when the trigger is pulled.
Commercial ESD Simulators
KeyTek MiniZap
Of course, the best approach would be to use a commercial ESD simulator. I like the Thermo KeyTek "Mini-Zap" (see Figure 7). These were discontinued for many years, but are now manufactured by M Precision Laboratories. Used ones may be commonly found in the used market for under $3000. Be sure they come with the charger, ground wire, and both contact and air discharge tips.
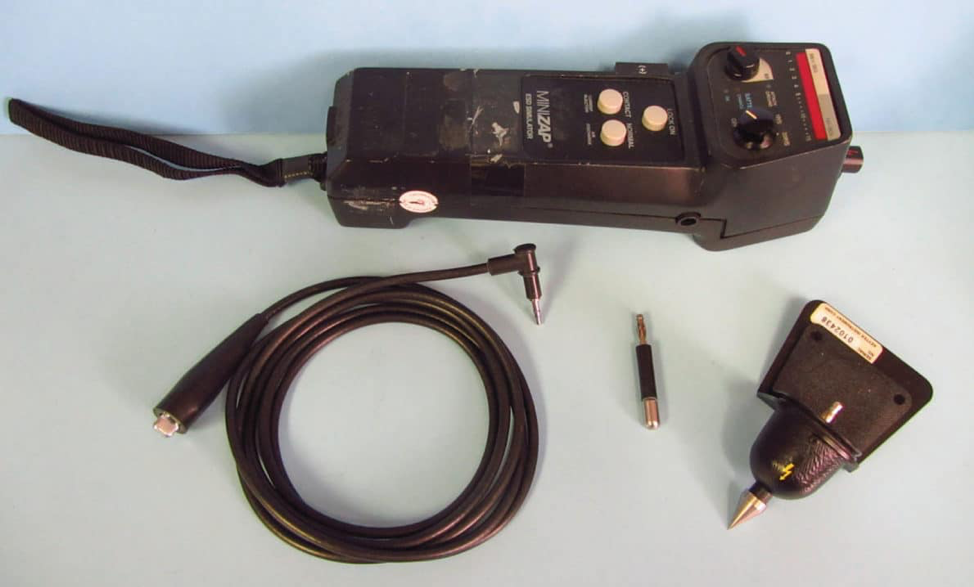 Figure 7. The Keytek Mini-Zap is a handy handheld ESD simulator that can test up to 15 kV. The contact discharge tip is shown.
The ESD standard, IEC 61000-4-2, describes the test setup and procedure for performing the testing. Many companies decide to construct the table and ground plane so they can perform the testing in-house.
Detecting ESD
Because ESD is quite transient in nature, it can be difficult to correlate specific ESD events to product upset. In many cases, if you find your product has strange upsets, (for example, loss of data or unusual circuit resets,) it could very well be caused by ESD.
AM Broadcast Radio
So, besides spending about $1000 for a commercial ESD detector, how can you detect ESD a little more inexpensively? It turns out that an AM broadcast radio, tuned off-station, is very sensitive to ESD events (see Figure 8). This will allow you to hear ESD events as “clicks” in the static.
 Figure 8. An AM broadcast band radio tuned off-station is useful for detecting the ‘‘clicks’’ of ESD events. Pictured is the Grundig model M400 AM/FM/SW radio.
The AM radio does well at detecting events, but wouldn’t it be nice if you could build up a simple circuit to not only detect ESD, but beep when it occurred, as well as counting the events? I found a circuit for a “Lightning Detector” that also works quite well for detecting ESD.
DIY Detector
I leveraged this basic circuit to construct a DIY ESD detector (see Figure 9 and Figure 10). I added additional circuitry to light an LED and activate a piezoelectric “beeper”. I also found a low-cost digital totalizer with manual reset to tally events over a particular time period.
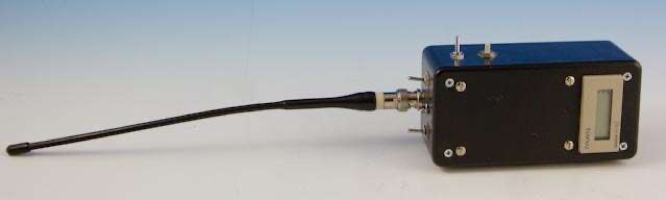 Figure 9. A simple DIY ESD detector with flashing LED, a beeper, and digital totalizer. The design is based on a lightning detector circuit obtainable from the internet.
Details on the construction may be obtained from my website. The digital totalizer is a surplus Omron H7EC-series, available used from a number of sources for about $30. The other components are available from your local Radio Shack or other electronics supplier.
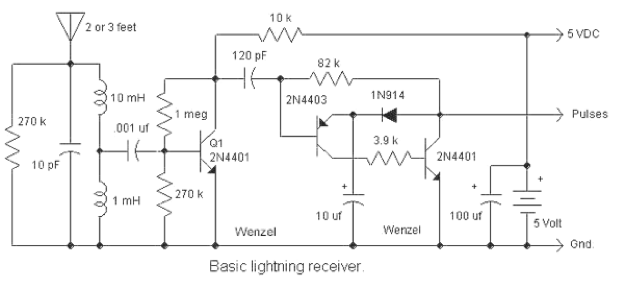 Figure 10. This is the basic circuit for the DIY ESD detector. I added additional circuitry for the flashing LED, beeper, and digital totalizer.
The circuit is based on a simple lightning detector designed by Charles Wenzel. It was since improved by Wenzel and described on his website, which can be accessed here. With a three-ft. telescoping antenna, the unit can detect ESD events from 30 ft. away, or more.
Commercial ESD Detectors
A better commercial tool would include the “ESD Pro” ESD detector (see Figure 11), manufactured and sold by Static Control Systems. It is extremely sensitive and will detect ESD from hundreds of feet away.
 Figure 11. A typical commercial ESD detector. This one is Static Control Systems’ model “ESD Pro.” (Courtesy of Static Control Systems.)
Summary
The key to troubleshooting ESD issues is to have a ready source of ESD to inject into the system under test. Alternative sources, such as a bag of coins, can be used as a gross measure of ESD immunity, but the best route is to include an ESD simulator to your EMC troubleshooting kit.Next month, I will describe a way to detect the path of ESD current. Knowing the dominant path helps identify particular components that might lead to mitigating the failure. Using a controlled ESD source and a way to identify the dominant current path makes it easier to determine if current diversion (to chassis) or blocking with an impedance, such as a ferrite choke, are required to mitigate. This technique can reduce the troubleshooting effort from weeks to hours.
REFERENCES
1. K. Wyatt, "Detecting ESD Events," EDN, December 26, 2013, https://www.edn.com/detecting-esd-events/.
2. K. Wyatt, "Create Your Own EMC Troubleshooting Kit: Essential Tools for EMC Troubleshooting," Vol. 1, October 19, 2020, https://www.amazon.com/Create-Your-Own-EMC-Troubleshooting/dp/B08LGNFPC2.